This post is Part 0 of the Android AppSec 101 Series, where we analyze real-world mobile vulnerabilities, inspect source code, and implement secure fixes using the Allsafe laboratory target.
This post addresses the setup of the lab environment and the tools required for the rest of the series. The following posts will address the vulnerabilities found in the target application, following the OWASP Mobile Security Testing Guide (MSTG) and Mobile Top 10 vulnerabilities.
- Part 0: Introduction (You are here)
- Part 1: Data Protection & Secrets
- Part 2: Android Component & IPC Security
- Part 3: Injections & Code Execution
- Part 4: Client-Side Bypasses
- Part 5: RE & Binary Patching
Overview & Environment Setup
| Category | Tool | Purpose |
|---|---|---|
| Lab Environment | Android Studio Emulator or Genymotion | Running the target application (Android 10+ recommended) |
| Static Analysis | JADX-GUI | Decompiling DEX/APK to Java code |
| Static Analysis | Apktool | Unpacking, reading Smali bytecode, and repacking APKs |
| Dynamic Analysis | Android Debug Bridge (adb) | Interacting with device shell, inspecting logs, and sending intents |
| Traffic Interception | Burp Suite | Intercepting and analyzing HTTP/HTTPS requests |
| Traffic Analysis | Wireshark or HTTP Toolkit | Capturing and analyzing network traffic |
| Dynamic Instrumentation | Frida & Objection | Runtime hooking, bypasses, and native library analysis |
Step-by-Step Setup
We will not cover how to set up the lab environment in this post. It is assumed that the reader has an Android device or an Android Virtual Device (AVD) available and has a basic understanding of how to use these tools.
Step A: Target Installation & Connectivity
In emulators, such as the one from the Android Studio, we can just drag and drop the APK file into the emulator window to install it. In a physical device, or in emulators where drag and drop is not supported, we can use the following command:
# Verify the emulator is connected via ADB
adb devices

# Install Allsafe onto the emulator
adb install Allsafe.apk

# Confirm the package name on the device
adb shell pm list packages | grep allsafe
Step B: Setting Up Frida Server
Frida is a dynamic instrumentation framework that allows us to hook into running processes and inject our own code. It is a very powerful tool for reverse engineering and security testing. To install its server on the device, we can use the commands below. We are not going to explain how to install Frida on your host machine in this post, but you can find more information on the Frida documentation.
Also, before you start, you will need to root your device in case you haven’t done so already. There are several tools to root an Android device, such as Magisk, Magisk through rootAVD, SuperSU, and KernelSU. I’m not going to explain how to root an Android device in this post. There are a lot of guides on the internet for each tool.
# Check emulator architecture (x86, x86_64, arm64)
adb shell getprop ro.product.cpu.abi

# Push matching frida-server binary to the device
adb push frida-server-16.x.x-android-x86_64 /data/local/tmp/
adb shell "chmod 755 /data/local/tmp/frida-server"

# Run frida-server as root
adb shell "su -c /data/local/tmp/frida-server &"
It is important to notice that the device architecture (x86, x86_64, arm64) must match the architecture of the frida-server binary you are using.
Step C: Installing the CA Certificate (for HTTPS Interception)
To intercept encrypted HTTPS traffic between the target application and external backend services using tools like Burp Suite or OWASP ZAP, you must install the proxy’s Custom Certificate Authority (CA) on the device.
But why do we need to install the CA certificate?
A common point of confusion (myself included when I started with mobile security testing) is why we must install a certificate when we can simply configure the Android Wi-Fi settings to use Burp Suite as a proxy. The difference lies in how Android handles Routing versus Trust for network traffic. In short, the Wi-Fi proxy setting only handles routing, while the certificate handles trust.
- The Wi-Fi Proxy handles Routing: It tells the device to send outgoing traffic through Burp. This works out of the box for unencrypted HTTP traffic.
- The Certificate handles Trust: HTTPS traffic is encrypted. To intercept it, Burp must act as a Man-in-the-Middle (MITM) and dynamically generate its own SSL certificates on the fly. If Android does not explicitly trust Burp’s Root Authority, the OS will reject the connection to protect against MITM attacks, and the app will fail with SSL handshake errors.
Quick Note on Modern Android Versions:
To successfully intercept encrypted HTTPS traffic between the target application and external backend services, you must install the proxy’s Custom Certificate Authority (CA) on the device. Starting with Android 7.0 (API level 24), Android by default does not trust user-installed CA certificates for app traffic unless explicitly configured in the app’s
networkSecurityConfig. For testing environments, you can either install the certificate into the User Credential Store (and modify the APK if necessary) or push it directly into the System Credential Store on a rooted emulator.
1. Exporting the Certificate
- Open Burp Suite and navigate to Proxy > Proxy settings > Import / export CA certificate.
- Select Certificate in DER format and save it as
cacert.der.
2. Option A: Installing to User Store (Standard Method)
This method works across most Android versions without requiring system partition modifications.
# Convert DER to CRT/PEM format so Android recognizes it easily
openssl x509 -inform DER -in cacert.der -out burp.crt

# Push the certificate to the emulator's SD card/storage
adb push burp.crt /sdcard/
After pushing the file, finish the installation via the emulator’s GUI:
- Open Settings > Security (or Security & Privacy).
- Tap More Security Settings > Encryption & Credentials.
- Select Install a Certificate > CA Certificate.
- Tap Install Anyway when prompted with the warning, then select
burp.crtfrom storage.
3. Option B: Installing to System Store (Root Required)
Installing the certificate directly into the System Trust Store (/system/etc/security/cacerts/) forces the Android OS to treat your proxy certificate as a trusted system CA.
# Calculate the subject name hash for OpenSSL 1.0+
HASH=$(openssl x509 -inform DER -in cacert.der -subject_hash_old | head -n 1)

# Convert the DER cert into a System CA-compatible .0 file
openssl x509 -inform DER -in cacert.der -out ${HASH}.0

# Mount /system partition as writable (on Android 10+ emulators started with -writable-system)
adb root
adb remount

# Push the certificate into the System CA directory and adjust permissions
adb push ${HASH}.0 /system/etc/security/cacerts/
adb shell "chmod 644 /system/etc/security/cacerts/${HASH}.0"

# Soft-reboot or restart zygote to refresh trusted authorities
adb shell "stop; start"
But if the emulator doesn’t have the /system directory mounted as writable, which cannot be bypassed or remounted, we can use the Magisk module Trust User Certificates to install the certificate as a system certificate. This module copies all installed certificates of the USER into the SYSTEM store during boot, without modifying the system partition.
Once installed, configure your emulator’s Wi-Fi / Ethernet AP proxy settings to point to your host machine’s IP (e.g., 10.0.2.2:8080 for default Android Studio emulators) to capture traffic in Burp Suite.
After Android 14, the system started to use other methods to store CA certificates, which broke some of the previous methods. The articles in the references below show how to install CA certificates on Android 14 and newer versions.
Step D: Alternative Traffic & Log Analysis (HTTP Toolkit & Wireshark)
While Burp Suite remains the primary tool for manual HTTP/HTTPS request interception and tampering, specialized tasks — such as handling strict certificate barriers on newer Android releases or capturing non-HTTP traffic — benefit from dedicated tools.
1. HTTP Toolkit (Automated Interception)
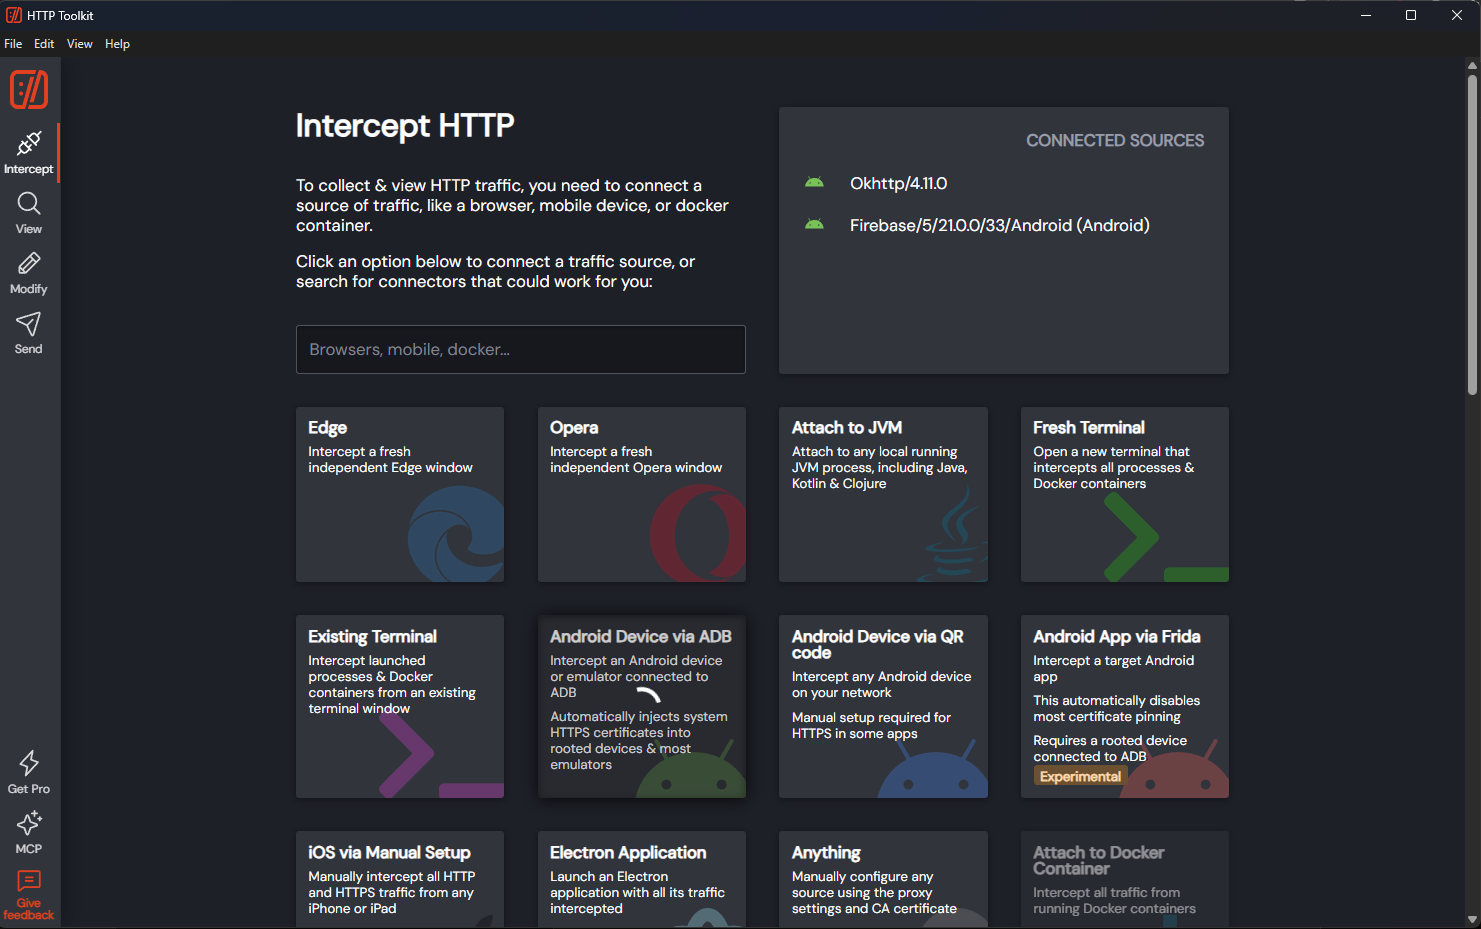
Manual CA certificate installation (as shown in Step C) can be tedious, especially on Android 14+ where system trust stores are protected. HTTP Toolkit simplifies this by automating the entire setup.
- With your AVD or rooted device connected via ADB, select Android Device via ADB inside HTTP Toolkit.
- The tool automatically injects HTTP proxy settings, provisions a temporary system CA certificate, sets up a local VPN interface, and hooks application processes without requiring manual Wi-Fi configuration.
2. Wireshark & androiddump (Low-Level Network & Logcat Capture)
Burp Suite is optimized for web traffic, making it less suitable for non-HTTP/HTTPS protocols (such as raw TCP/UDP sockets, MQTT, or custom binary streams) or system log monitoring. Wireshark addresses these gaps through its built-in extcap utility, **androiddump**.
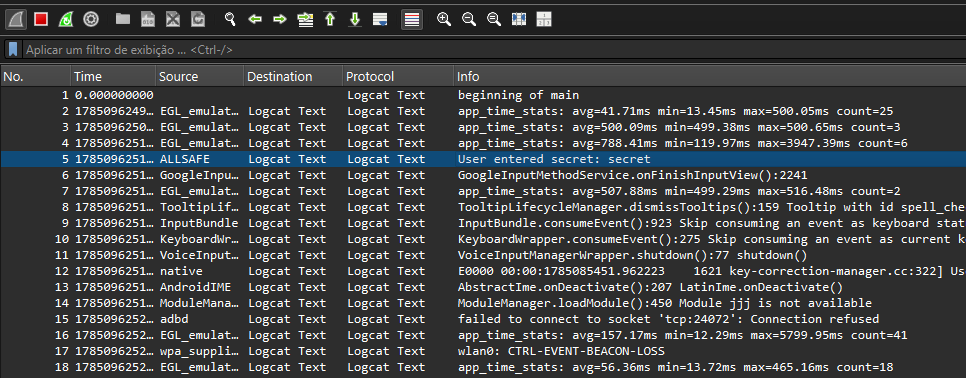
androiddump allows Wireshark to capture system logs (logcat) and network traffic directly from an Android device over ADB in real time:
- Connect your device via ADB (
adb devices). - Open Wireshark on your host machine. On the interface selection screen, locate the Android interfaces:
- Android Logcat Main / System: Streams system logs directly into Wireshark, allowing you to filter logs using display expressions like
logcat_text.tag contains "ALLSAFE". - Android tcpdump: Captures raw packet traffic from the device’s network interfaces.
- Start the capture to correlate system events and network traffic on a single timeline.
References & Additional Resources
- Modern Android Penetration Testing Lab Environment - LRVT
- Installing Burp Suite CA as a System Cert on Android - Redfox Cyber Security - Alternative installation methods.
- Android 14 blocks modification of system certificates, even as root - Tim Perry
- New ways to inject system CA certificates in Android 14 - Tim Perry
- Androiddump Manual Page - Wireshark